Ok, so you’re not too happy about paying for ringtones or don’t like the fact that non-DRM songs can’t be used by iTunes to create ringtones. I’ve got a great solution for you using iTunes. The instructions below will show you how to create a ringtone for your iPhone using iTunes and non-DRM songs. The method works by modifying the start and end time of a song then creating a duplicate of the song. This duplicate is then removed from the Library, the file extension is changed, and the song is added back as a ringtone. Voila! Non-DRM songs can now be used as ringtones in iTunes.
Note: I used iTunes 9.2 for this tutorial. The ringtones can be used on all iPhone models, iPhone 3G, iPhone 3GS, and iPhone 4.
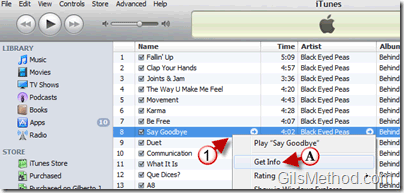
1. Right-click on the song you wish to create a ringtone from and A. click on Get Info from the menu.
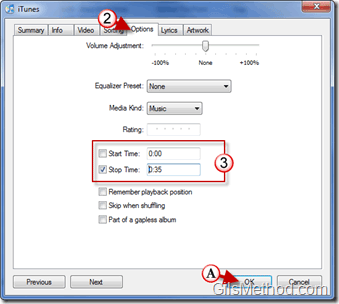
2. When the song information window opens, click on the Options tab.
3. Enter the Start Time and End Time for the song (this will determine how long the ring tone is and where in the song’s timeline it will start and end). Click OK once you changed the settings.
Note: This will not affect the original song.
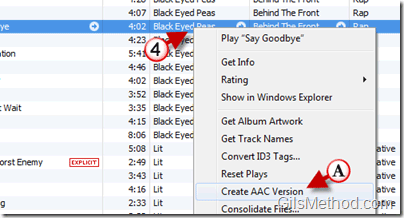
4. Right-click on the same song and A. click on Create AAC Version from the menu.
Wait for iTunes to duplicate the song you selected.
Once completed, a new song with the length you specified in step 3 will appear. It should appear right below the song you originally selected.
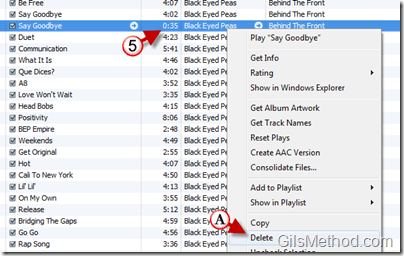
5. Right-click on the new song (make sure to select the correct song) and A. click on Delete from the menu.
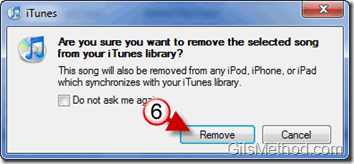
6. You may or may not see the warning above. If it does appear, click on Remove.
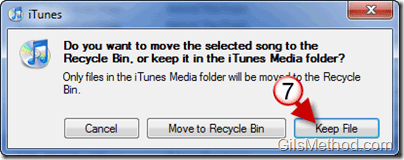
7. When you see this prompt, make sure to click on Keep File.
This will remove the file (the ringtone) from the iTunes library as a song and leave the new file in the iTunes directory.
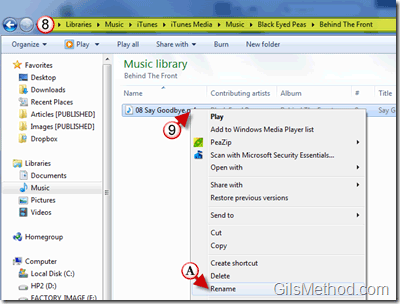
8. Locate your iTunes directory. In Windows 7 it will be located in “C:\Users\[Windows User Name]\Music\iTunes\iTunes Media\Musicâ€
Find the folder containing the new song within the album’s directory and locate the individual file.
9. Once you locate the file, right-click on it and A. click on Rename to change the file’s extension.
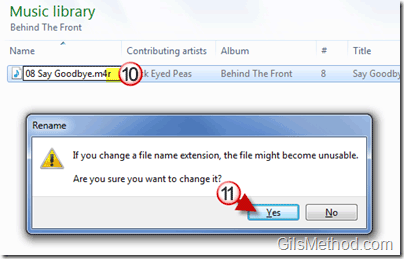
10. Change the file extension from “.m4a†to “.m4râ€.
11. You should see a warning stating that changing the file extension can be harmful. Click Yes to proceed.
Once the file extension changes, double-click on the file and iTunes should open.
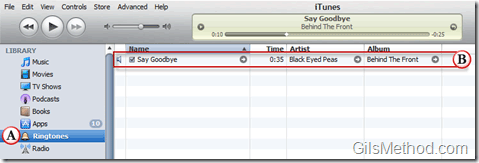
A. When you click on Ringtones in the navigation pane, you will B. find the newly added ringtone to the list.
It’s not the quickest solution to get ringtones to your iPhone, but it sure works. Do you know of other methods to get ringtones into iTunes? Please use the comments section below.
Update 7/13/2010 -Â NOTE: After following step 7 of the tutorial to create the new shorter sound file, be sure to go back into the properties of the original song (see steps 1-3) and UNCHECK the Start and Stop times. Otherwise, your entire song will not play in iTunes or on your iPhone! Thanks to Scott for pointing this out in the comments section below.
Adapted from ehow.com

