One of Picasa’s newest features (introduced in version 2 and expanded in 3) is the ability to view RAW pictures and convert these images to JPEG’s. All you have to do is add your RAW files to Picasa and follow the instructions below to convert them to the JPEG format. As far as I can tell JPEG is the only format that Picasa exports to. The instructions to convert your RAW files to JPEG’s are listed below.
Note: This guide will also show you how to watermark your images in Picasa.
Video Guide Followed by Step-by-step Guide Below
If you have any comments or questions, please post them in the comments section at the end of the guide. If you don’t know what RAW format is and would like to find out more, read this Wikipedia entry.
Software/Hardware used: Picasa 3 running on Windows, but the same will apply on the Mac version of Picasa.
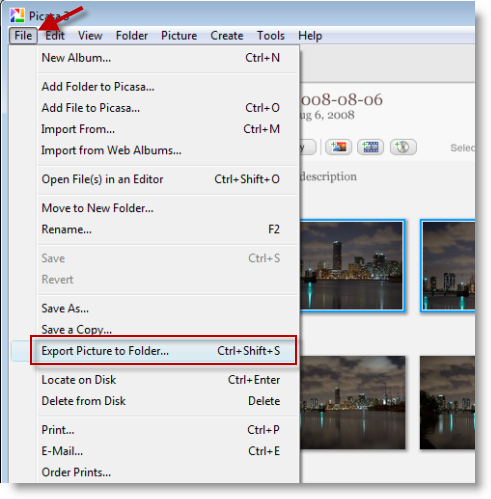
1. Select the images you wish to convert from RAW to JPEG in Picasa and click File then Export Picture to Folder…
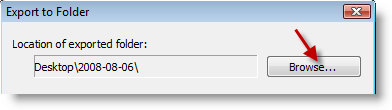
2. The Export to Folder dialog box will open, click Browse to select the destination of the folders you are exporting. Select the directory where you would like Picasa to place the converted images and click OK. This directory is where the folder containing the converted JPEGS will be located.
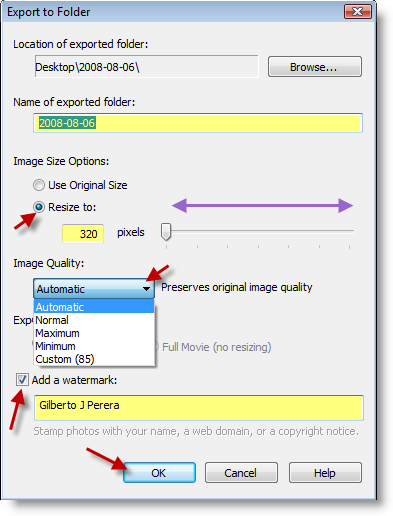
4. The Export to Folder window offers several options;
A. Name the folder your files will be exported to.
B. Select the Image Size you would like to use by choosing Use Original Size or Resize to: (move slider left to right to adjust dimensions)
C. Select the Image Quality from the drop-down menu. If you chose Automatic it will preserve the original image quality.
D. Add a watermark: You can add a text watermark to your picture.
Once you’re done, click OK
Note: Depending on the number of pictures you chose to export and your computer’s performance, it may take anywhere from a couple of seconds to a couple of hours to convert your pictures.
When you browse to the directory that your exported pictures were saved, you will be presented with JPEG files and watermarks (if chosen) located on the bottom right of the picture.
If you have any questions please use the comments form below.
