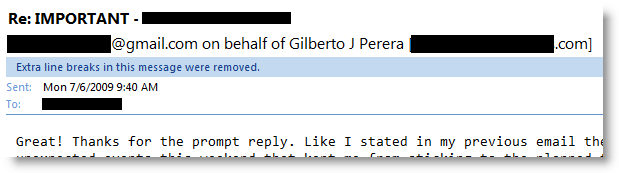
If you have ever sent an email using Gmail with one of your other email accounts (bellsouth.net, yourdomain.com, etc) you’ll notice that the message sent to the recipient lists, [email protected] (your real email – @yourdomain) on behalf of [email protected] (your Gmail account @gmail) as the From: address.
Gmail announced today that they will allow users to send messages via Gmail using their own domains. This is great for Gmail users who would like to use multiple email addresses from one client. This also helps users look look professional and use the client that they love most.
From the Gmail Blog,
We heard your request for another option that wouldn’t show the "on behalf of" text loud and clear, and now there’s a new option that does just that. Instead of using Gmail’s servers to send the message, we’ll use the servers where your other email address lives. Since Gmail isn’t the originating domain, we don’t have to include "Sender" info in the header. No more "on behalf of."
How it Works
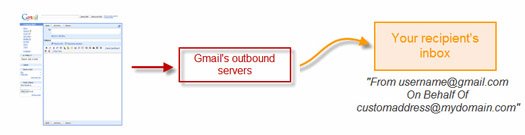
The old way – Gmail would send your emails using their domain name and attach an On Behalf Of to the send from address.
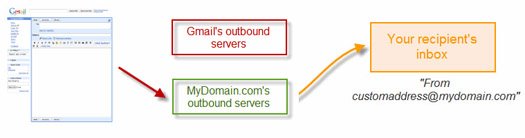
The new way – Gmail allows you to use your own domain to send messages. You look professional and get to use your favorite email client.
Images and description via Gmail Blog
The guide below will walk you through the simple process of updating your account so that you can start sending emails using Gmail with your domain.
If you have any comments or questions please post them below.
Set Up Gmail with Your Domain
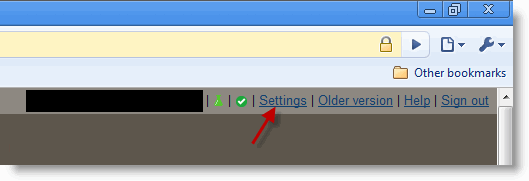
1. While logged on to Gmail – Click on the Settings link located on the top-right corner of the screen.
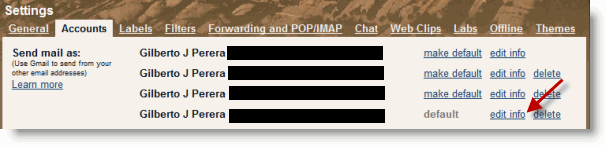
2. In the Settings menu, click on the Accounts tab. Under the Send mail as section, click on the edit info link for the email address you would like to modify.
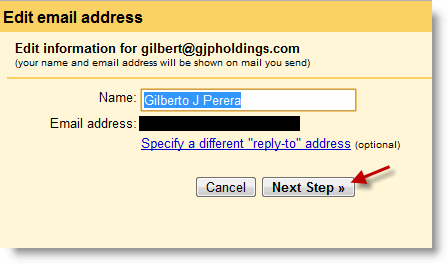
3. Click Next Step
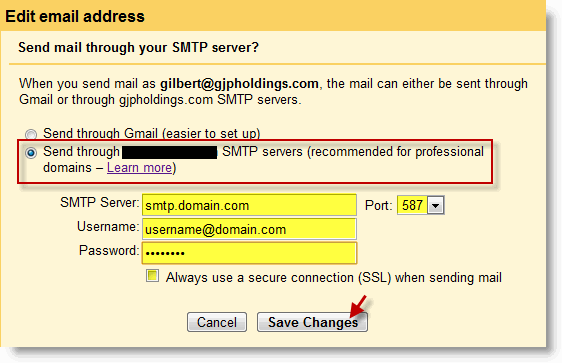
4. When prompted, click on the Send through yourdomain.com SMTP servers radio button and enter the following information;
SMTP Server – in my case I use 1and1 for my domains, so the SMTP server is smtp.1and1.com if you use Yahoo!, MSN, GoDaddy, or another service you must log on to your email providers website to locate this setting.
Port – This value was also specified by 1and1, in my case it is 587, make sure to the same as you did for the SMTP.
Username – The username used to log on to your email account (not Gmail, but the account you are attempting to modify).
Password – Again the password for the account you are attempting to modify, not the Gmail account.
If your email provider supports an SSL secure connection make sure to add a checkmark to the Always use a secure connection check box.
Click Save Changes when you’re done.
Please Note: If you are having trouble authenticating try disabling the SSL security, your email provider might not support it.
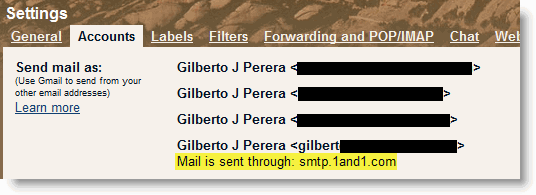
5. Once you’ve saved the settings you will see the following message (will vary by email provider) below your email address;
Mail is sent through: smtp.yourdomain.com
