Data entry rules in Excel give users more control over the type of data that can be entered into cells in spreadsheets. We discussed how to use lists in a previous how-to, in this example we’ll show you how to specify the data type that can be entered and the different options available to you. We will also show you how to create custom input and error messages to ensure that users understand the limitations imposed by the spreadsheet’s creator.
In the example below I created a spreadsheet for use in grading students. I’ve assigned two columns to records grades, one column will be restricted to a grading scale of 0-100 and the second will be a GPA integer from 0-4.0. In this specific example I will show you how to set up the data validation rules for the 0-100 scale. I will also create a custom input message and error message.
If you have any comments or questions please post them below.
Note: I used Windows Vista Ultimate when creating this tutorial.
Adding Data Validation Rules to a Cell
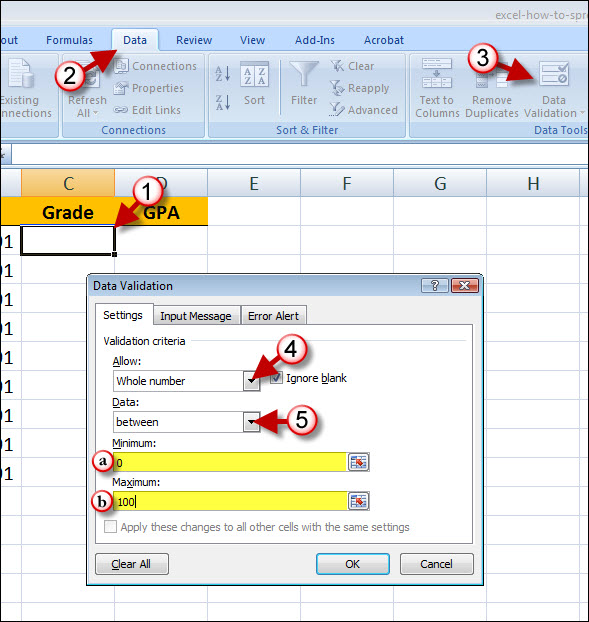
1. Click on the cell you wish to add the validation rule to..
2. Click on the Data tab located in the Ribbon
3. Click on the Data Validation button located in the Data Tools group.
The Data Validation dialog box will open and it should default to the Settings tab.
4. Choose Whole Number/Integer (depending on restriction you wish to place) from the Allow drop-down menu. I chose Whole number for this example.
5. Choose the criteria from the Data drop-down menu. I chose between for this example. This will allow me to specify a Minimum and Maximum value.
a. Type in a Minimum value
b. Type in a Maximum value.
Note: You can click OK an exit the dialog box, however you will see the default error and input messages, to customize those messages follow the next set of steps.
Create a Custom Input Message
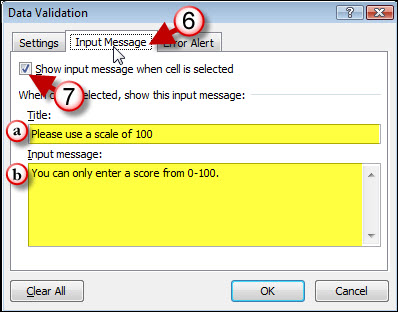
6. Click on the Input Message tab.
7. Add a checkmark to the Show input message when… check box.
a. Enter a title for the message that will appear
b. Type the message you wish to appear when users activate the cell.
Create a Custom Error Message
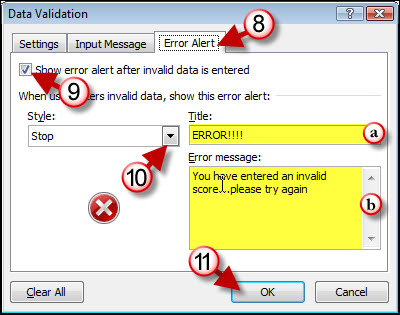
8. Click on the Error Alert tab.
9. Add a checkmark to the Show error alert after… check box.
10. Choose a style from the Style drop-down.
a. Enter a title for the error alert that will appear
b. Type the message you wish to appear when users make an invalid entry..
11. Click OK to apply the rule to the cell.
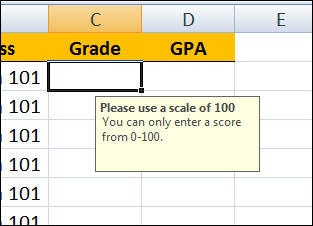
The example above illustrates how the input message appears when the cell is activated. You will only be able to enter (based on the rules I created) a value from 0-100.
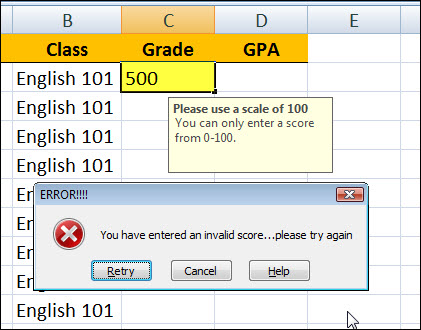
If you attempt to enter a value outside of the parameters specified you will see the custom error alert we created.
To apply this rule to other cells in your spreadsheet you can copy and past the formatting as indicated in Use AutoFill and Save Time Entering Data in Excel.
