In order to access your Windows 7 computer remotely with Remote Desktop Connection, your computer must meet the following criteria.
- Your edition of Windows 7should be Professional, Ultimate, or Enterprise
- Your computer needs to be on a network
- Lastly the computer you wish to connect to needs to allow remote desktop connections
The third criteria is where this how-to comes in. By default, your computer does not allow remote desktop connections which is a good thing because you don’t want your computer to be accessible to others in your network or worse outside of your network. To enable this feature so that you can access your computer remotely, follow the instructions below.
If you have any comments or questions, please post them in the comments section located at the end of the post..
Note: I used Windows 7 Ultimate to create this tutorial.
Enable Remote Desktop Connection
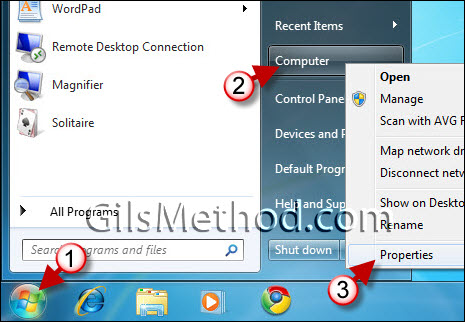
1. Click on the Start Button (the Orb)
2. Right-click on Computer
3. Click on Properties from the drop-down menu.
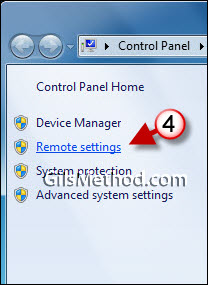
4. Click on the Remote Settings link located on the left pane in the System window.
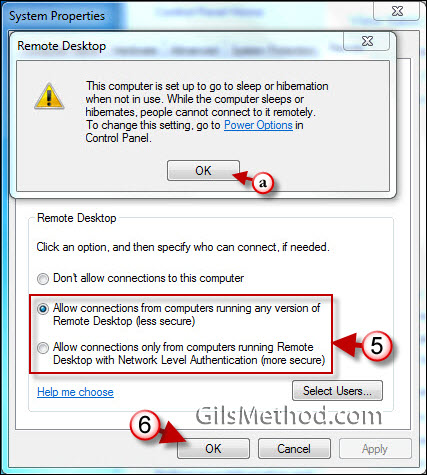
5. You have to options when you allow remote connections to your Windows 7 machine, both are described below.
- Default setting – Don’t allow connections to this computer
- Allow connections from computers running any version of Remote Desktop (less secure)
- Allow connections only from computers running Remote Desktop with Network Level Authentication (more secure) – see explanation on Network Level Authentication at the end of the how-to.
Now that you know the options you have, choose one of them.
a. When you choose one of the options other than the default you may see this dialog box if you have sleep or hibernation enabled when the computer is not in use. Just be aware that if you do have sleep or hibernation enabled you may not be able to remotely connect to your computer if it has not been in used by a specified time. Click OK to proceed.
Configure User Access to Your Remote Desktop
6. Once you selected an option to allow connections, click on Select Users to choose who will have access to your computer remotely.
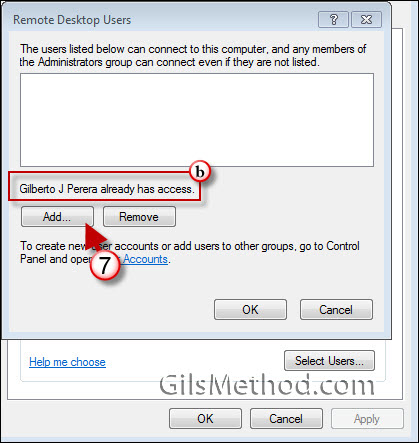
7. Click on the Add button to add users to the list of those authorized to access your computer remotely.
b. Note that you (the person logged on from the Administrators group) will automatically have access regardless of your name being listed here.

8. Click on Advanced to locate a name in the user directory.
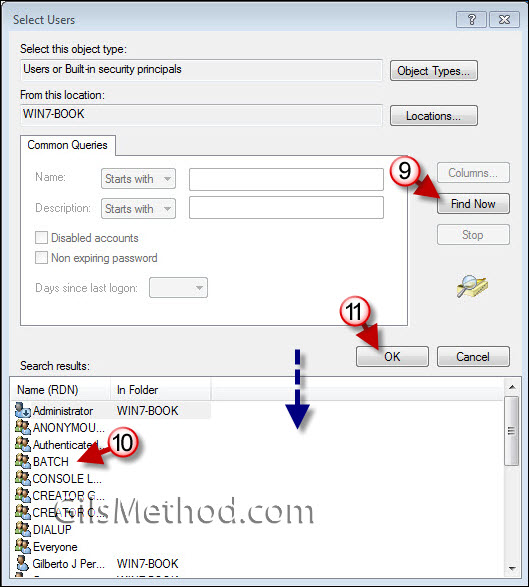
9. When the Select Users dialog box opens click on the Find Now button to list all of the users with local access to your computer.
Note: I am only going over the basics of adding users, this option has a couple of advanced settings that are not being covered here.
10. Click on the user you wish to grant remote access to.
11. Click OK.
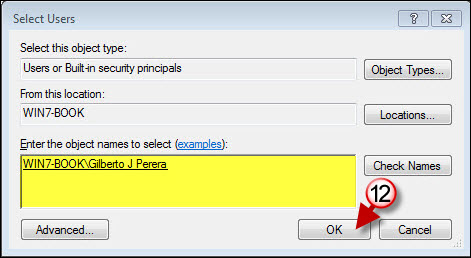
12. You will notice that the user you selected will now be listed in the object names area (highlighted above). Click OK to proceed.
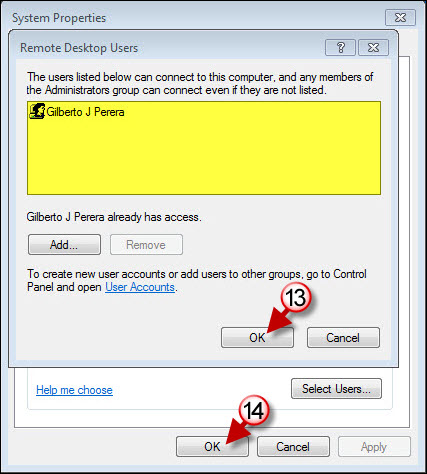
13. The user you selected is now listed in the group of users who have access to your computer remotely. Click OK to close the Remote Desktop Users dialog box.
14. Click OK to close the System Properties dialog box.
Your computer can now start receiving Remote Desktop Connections from the users you specified in the Remote Desktop Users list.
A little more about Network Level Authentication from the Microsoft website,
"Network Level Authentication is an authentication method that completes user authentication before you establish a full Remote Desktop connection and the logon screen appears. This can help protect the remote computer from hackers and malicious software. "

