If you are new to computers and find yourself dumbfounded by the number of keyboard combinations and key and mouse click combinations that exist, this guide may help you alleviate some of that stress. In Windows you are able to select a single or multiple files at a any given time. To select more than one file requires that you drag a selection box around the files you wish to select, but what if you need to select only specific files? You can use the keyboard mouse combination, [CTRL] + click on the files to select/unselect. If that’s too much to remember you can always enable checkboxes for files and folders in Windows 7 which is much simpler.
If you have any comments or questions please use the comments form below.
Note: I used Windows 7 Ultimate for this guide.
Make sure that you have a Windows Explorer window open before proceeding.
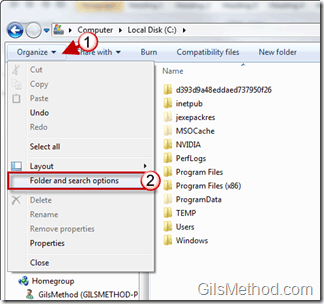
1. Click on the Organize button.
2. Click on Folder and Search options from the menu.
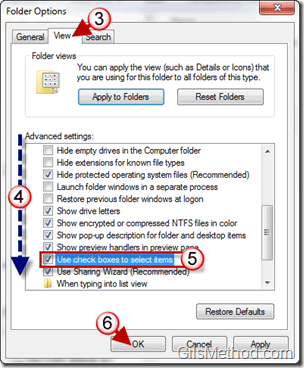
3. When the Folder Options window opens, click on the View tab.
4. Scroll down the list of settings until you find the Use check boxes to select items.
5. Turn on Use check boxes to select items.
6. Click OK to save the settings.
A. You will now be able to select files and folders using check boxes.
To disable the setting just repeat the steps above and toggle off Use check boxes to select items.


