If you’re tired of carrying USB Flash Drives and are looking for a way to safely and securely store information on the go, what better option than the device you already have with you all day long, your iPhone.
Chances are that you have a couple of free gigs of space on your iPhone that are currently unused, why not offload files from your flash drive to your iPhone and lessen your worry about an additional device getting lost. Normally when you plug in your iPhone to the computer you can only access the DCIM folder containing the images you have taken with your iPhone, but what if you wanted to create a folder to copy files to the iPhone or download other media files? You can’t, unless you use iTunes with its many limitations …this is where Phone Disk comes in.
You would normally have to pay for software like this, however the folks at Macroplant (Phone Disk’s Developers) are providing free licenses for the Phone Disk application until December 2010. Which means that you will be able to use the application beyond the 15 day trial period with free updates for the life of the product.
Become acquainted with the application using the screenshots below and follow the link at the end of the article to download and register a free copy of Phone Disk.
Note: I used iTunes 9.2 and Phone Disk 1.009 (Windows version) for this guide. The promo code is valid until December 1st, 2010.
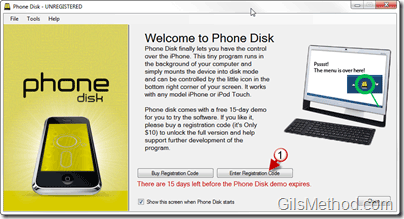
After you install Phone Disk you will be greeted by the Welcome Screen above. Click on the Enter Registration Code button.
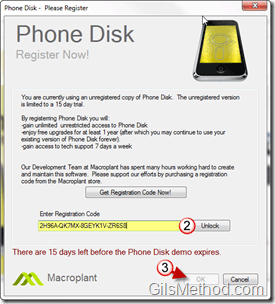
2. Enter the following registration code (2H96A-QK7MX-8GEYK1V-ZR6S8) and click the Unlock button.
3. Click OK to save the information and close the window.
Launch and Customize Phone Explorer Settings
The following assumes that your iPhone/iPad is plugged in to your computer.
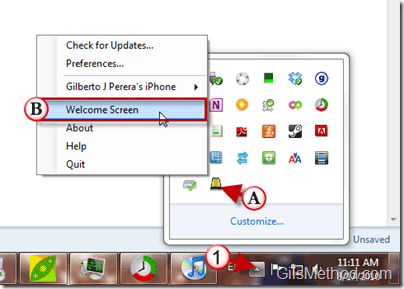
1. Once installed, click on the Notification Area to open the hidden icons.
A. Right-click on the Phone Explorer icon.
B. Click on Welcome Screen from the list.
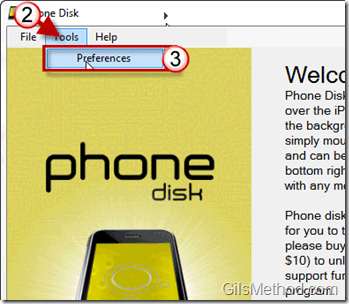
2. When the Welcome Screen opens, click on Tools.
3. Click on Preferences from the list.
4. On this screen you will be presented with several options:
Run Phone Disk when Windows Starts – If you plan to lug your iPhone around as your memory stick I would leave this enabled.
Show welcome screen when Phone Disk starts – Unless you plan to change the Preferences each time you boot up you computer I would disable this option.
Allow connecting to the Media mount point to use AFC2 to reveal the “real root†directory – Unless your iPhone is Jailbroken I would ignore this option.
When Phone Disk is reopened it should reconnect to the same mount point that is was last connected to – This is a personal preference. For example if you would always like to open the iPhone to your media files you can check this option.
5. When you are done, click OK to save the settings.
How to Access Your iPhone Using Phone Explorer
1. To explore the contents of your iPhone (not Jailbroken), click on the Notification Area to open the hidden icons.
A. Right-click on the Phone Explorer icon.
B. Click on Your iPhone from the list.
C. Click on Reveal In Explorer from the list.
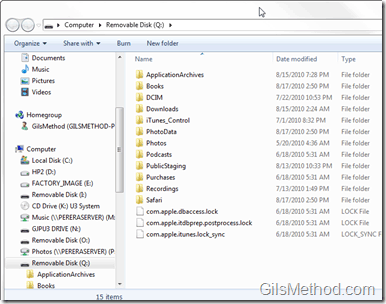
A Windows Explorer window should open with a list of files contained in your iPhone. Feel free to create a directory to use as your Flash Drive and make sure to keep in mind the available storage on your device. You can also use this window to copy and paste files (music, recordings, pictures, and other file types) to and from your iPhone.
Error Messages
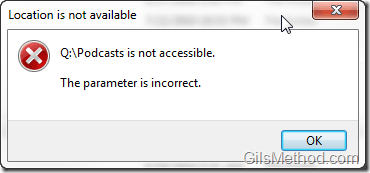
While browsing your iPhone using this application you may encounter the following error messages. It appears that if you do a lot of back and forth browsing on the iPhone using Windows Explorer the connection seems to freeze.
ERROR – Location is not available – “Directory†is not accessible.
The parameter is incorrect.
If you encounter this error, simply click on the OK button and unplug the iPhone. Wait a minute and plug in your iPhone and try again.
You may also see the Insert Disk error above. If you encounter this error, simply click on the OK button and unplug the iPhone. Wait a minute and plug in your iPhone and try again.
Application Features and Requirements
Below you will find a list of features and requirements from the developers site.
- Preview, open, edit and save images, documents and more directly on the the device. You can even access the device directly through other programs such as a document editing program.
- Phone Disk provides seamless integration of iPhone, iPad & iPod Touch file system in OSX’s finder
- Optionally, automatically launch program at startup.
- Mount multiple iPhones and iPod Touches simultaneously
- Works with or without jail breaking the device. It’s simple application that runs in your system tray and won’t clutter or slow your computer
- We’ve added a custom feature which allows images copied to the DCIM folder to be viewed directly in the Photos app (Mac version only).
Windows System Requirements
- Windows 7, Windows Vista or Windows XP
- iTunes 9 or later
- A USB Connector for the iPod device
Mac System Requirements
- Mac OSX 10.5, 10.6 or later
- iTunes 8, 9 or later
- A USB Connector for the iPod device
Compatible with all iPhone, iPad, and iPod devices
Download Phone Disk and use the promo code – 2H96A-QK7MX-8GEYK1V-ZR6S8


