Click here to try Mozy for FREE!
Recommended: Click here repair PC errors
Click here to run a Free Registry scan
WebWatcher

How to Create Movie Presentations and Slideshows in Picasa

by Gilberto J Perera View Comments Share
Picasa Movie Slideshow

One of Picasa’s newest features is the ability to create a Movie Presentation from a selection of videos and pictures. The feature allows you to customize the slide transitions, duration, and captions. This tool is excellent for those of you who like to create movie sideshows to upload to YouTube and/or to burn to a DVD for TV viewing. The how-to below will walk you through the movie creation process, if you have any questions or comments, feel free to post them below.

Note: You must have Picasa 3 to complete this tutorial and access these features. If you have Picasa 2 upgrade by downloading and installing Picasa 3

Picasa Movie

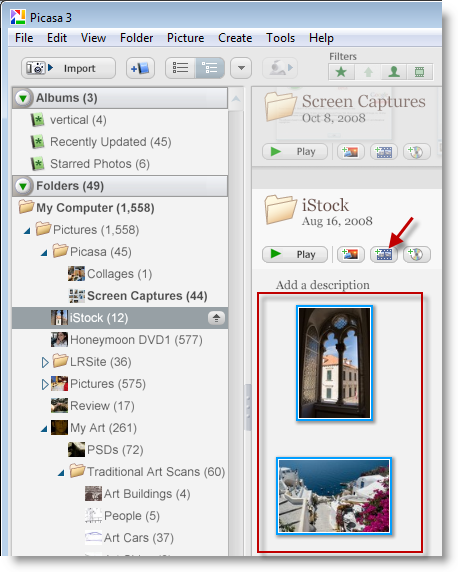
1. Select the pictures you wish to use for your movie and click the Create Movie Presentation icon

Note: You can also access the Create Movie Presentation option by clicking on Create > Movie… from the toolbar menu

Picasa Movie

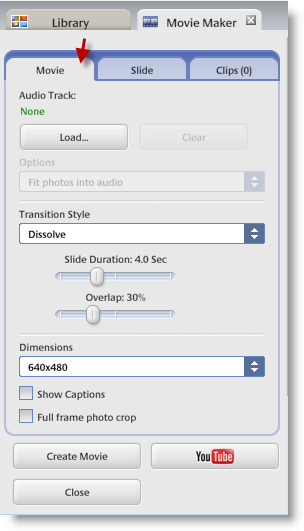
2. The Movie tab allows you to customize your movie by allowing you to;

  • Add an Audio track (click on Load… button to add music)
  • Select Transitions for the slides/overlapping/speed (see below)
  • Determine the Dimensions for the output file (see below, if you’re displaying the video on a wide screen, then you can set a wide screen resolution)
  • The option to show captions (picture name & comments) throughout the slideshow
  • Full frame cropping (crop to fit screen/no cropping)

Picasa Movie

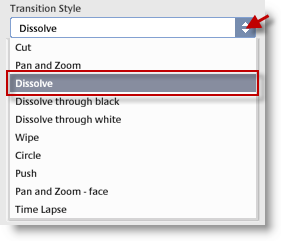
3. Click on the Transition Style drop-box to select your desired transition


Picasa Movie

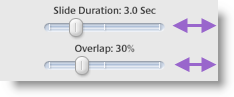
4. Use the sliders to adjust the Slide Duration and the % Overlap (opacity) during transitions.

Picasa Movie

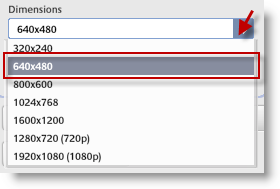
5. Click on the Dimensions drop-down to select the width and height in pixels for your video, (the higher the number the better the quality), notice that the drop-down includes options for 720p and 1080p televisions.

Note: I recommend using the 720p & 1080p for screens displaying those resolutions, anything lower than that and the image may not look its best

Picasa Movie

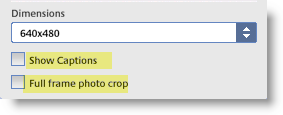
6. You can check the box to display caption (Show Captions) and allow the program to automatically crop your picture (Full frame photo crop) to fit the frame specified in the previous step.

Note: I recommend leaving Full frame photo crop unchecked unless you don’t mind pictures of people being chopped up in different places.

Picasa Movie

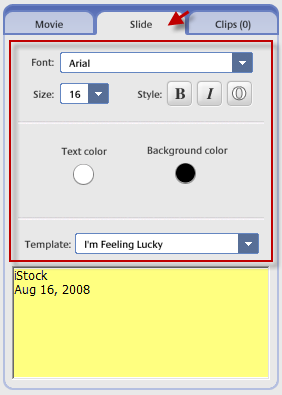
7. Click on the Slide tab to specify how your captions will be displayed. In this section you can add to the captions, set formatting, and assign templates for the text displayed.

Picasa Movie

8. The Clips tab allows you to Add/Remove to your selection of ‘clips’ being used to compose your movie, we’re going to get more clips by clicking on the Get More… button

Picasa Movie

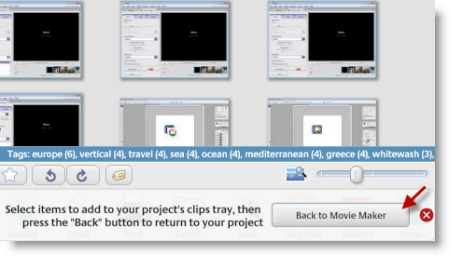
9. You will be brought back to your picture library, chose the pictures you wish to add and click on the Back to Movie Maker button located at the bottom of the library

Picasa Movie

10. Below the movie preview you can Delete or Add slides (you can add more blank slides with text by clicking on Add), you can also preview your movie by clicking on the Play button and/or moving the slide back and forth.

Picasa Movie

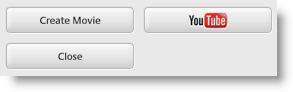
11. Once you are done editing your video you are presented with 3 options;

  • Create Movie (which is what we did for this tutorial) – Simply generates your movie file
  • Create Video and Upload to YouTube - This option will generate your video and prompt you for more options to upload to YouTube (see Step #15)
  • Close – Need I say more?

Picasa Movie

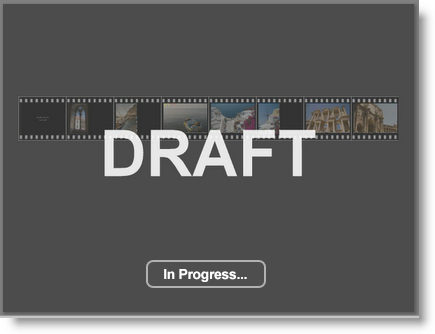
12. Your preview will change to the display above as your video is generated. Generation time depends on the number and quality of pictures used and of course your computers’ capabilities.

Picasa Movie

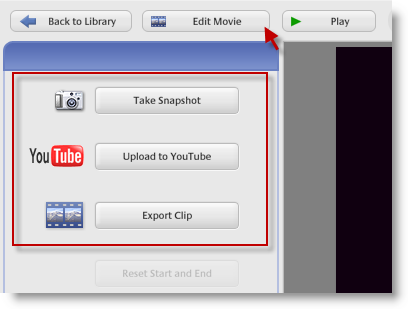
13. Once the video is completed you can;

  • Take Snapshot – Screenshot of a section of your video (screenshots will be stored under the Screenshot album)
  • Upload to YouTube – Allows you to upload to YouTube (see #15 for instructions)
  • Export Clip - Allows you to select a section of your video clip and export it as a separate file

Picasa Movie

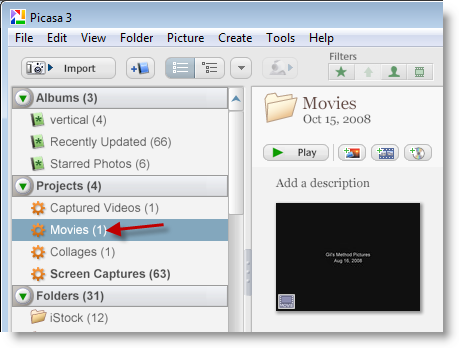
14. A new Projects album will be created named Movies, click the album to access your new movie and future movie projects

Picasa Movie

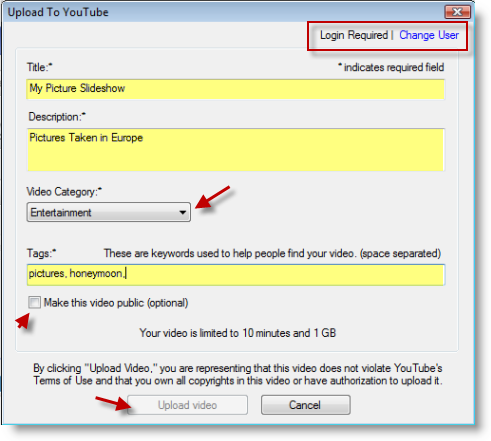
15. When uploading to YouTube you will be prompted with this dialog box, fill out the appropriate sections, and click the Upload video button.

Do you like this article?

Related Posts

  1. How to Create a Movie Using Faces in Picasa 3.8
  2. Create Photo DVD Slideshows Using Picasa and DVD Maker
  3. Use Live Movie Maker’s AutoMovie Feature to Create A Photo Slide Show in Minutes
  4. How to Create A Picture Slideshow for Your Website
  5. How to Upload Your Pictures to Picasa Web Albums
How-to

About the author

Gilbert is a Microsoft MVP, a full-time blogger, and technology aficionado. When Gilbert is away from his bike and his iPad, he's busy writing technology how-to's from his home-office in Miami, Florida on the latest programs and gadgets he can get his hands on. He's locally known as "the computer guy" and has spent the last 12 years helping family, friends, and GilsMethod.com visitors with their computer questions and problems. He was awarded the 2009 MVP award from Microsoft for his contributions in forums and blogs and is enjoying the new addition to his family.

Want more articles like this delivered for free to your inbox?

To receive the latest technology how-to's, news, and reviews, enter your email address below.

Sign up below

View Comments to “How to Create Movie Presentations and Slideshows in Picasa”

  1. Bill Macnamara says:

    How do you save a work in progress? Can you edit a project after it has been saved as a movie?

    • Gilberto J Perera says:

      A work in progress would require that you create the movie to save the changes you have made. Once the movie is created you can edit it by selecting the movie and clicking on the movie so that you get the large preview and then you click on the Edit Movie button (located on the top left next to the Back to Library button). Let me know if you need help with this. Thanks for passing by.

  2. Martina says:

    I have made the movie but cannot loop so it plays continuously. Can you help as I need this option. Organising a 40 wedding anniv and want the show to continue to run whilst having dinner. Can you help urgently? Thanks, Martina

    • Gil says:

      Martina,

      I don’t believe there is a way to loop it while creating the video. If you are using a DVD player, there’s gotta be an option to loop the video…If you are using it on a computer then you can have Picasa loop the slideshow.

      Click Tools > Options. When the options window appears, click on the Slideshow tab and toggle on Loop Slideshow.

      Hope this helps.

  3. Katie says:

    I wanted to burn a movie to a DVD out of Picasa. It's done with music etc. but now I can't find a way to burn it to a disc. Help!, KT

  4. Stacy says:

    I am trying to make my picasa slideshow movie loop around and start over by itself for continual play. How do I do that? I tried checking the “loop slideshow” box under options in tools but it still stops at the end of the movie. Thanks for any info you have!

  5. Gilberto J Perera says:

    @Isable: Great to hear that. Good luck.

  6. Gilberto J Perera says:

    @Paris: Unfortunately it appears that you can only add a song per slideshow. If you follow the instructions in the link below and use DVD Movie Maker from Windows Vista you should be able to add multiple songs to your slideshow. Another option would be to use an audio editing tool to string several songs together into one file and adding them to Picasa. Let me know if you need any help with either option. Good luck.

    http://www.gilsmethod.com/create-photo-dvd-slideshows-using-picasa-and-dvd-maker

  7. Gilberto J Perera says:

    @Marisa: Are you trying to use a song that was purchased on iTunes? If so it might not work…there are work arounds. If not what format is the music file you are trying to add? Thanks.

  8. Gilberto J Perera says:

    @Ivonne: I’m glad you were able to get it to work via YouTube. You still want to see if we can figure out what you are doing wrong. Ok so let’s start with the following;

    1. What web platform are you using? Are you using Dreamweaver and creating static pages or are you using a Content Management System like Wordpress, Joomla, Drupal?

    2. Are you uploading the video to your server?

    3. Do you have enough space to save video files?

    I think that would be a good start. Let me know, thank you.

Leave a Reply

blog comments powered by Disqus