The registry change discussed below tells the operating system to unload DLL(dynamic link library) files every time a program is closed. Most of the time whenever a program is closed the DLL’s hang around in your memory in case the program is loaded again. This means that if you computer remains powered on, it will have those unused DLL’s taking up precious memory. By enabling this setting the DLL’s will be unloaded upon program closure and you will regain lost memory.
Included with this tutorial I added a registry file that you can simply import into your registry that would make those changes for you. Below you will find the steps necessary to accomplish this. As always comments/suggestions are welcome.
Note: I recommend this tweak for people that have below 512MB of memory or if you are a developer and would always like to have DLL unloaded when you’re testing software. At higher memory levels 1GB plus, RAM is really not an issue if you’re just doing basic computing (i.e. no memory intensive applications).
WARNING: Before proceeding please backup your registry.
Click on the image below to download the 1 pager guide for the how-to below.
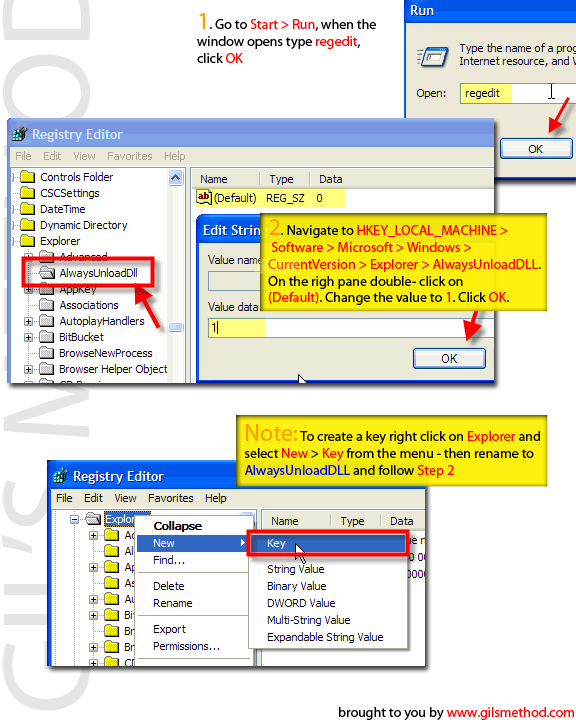
1. Go to Start > Run when the Run box opens type in regedit
2. After the Registry Editor opens navigate to the following key;
HKEY_LOCAL_MACHINE > Software > Microsoft > Windows > CurrentVersion > Explorer > AlwaysUnloadDLL
3. Click on AlwaysUnloadDLL and the (Default) key should appear on the pane to the right of the window.
4. Double click on (Default) and change the value from 0 to 1 (changing this value from 0 to 1enables the setting).
5. Click OK and restart your computer
No (Default), No Problem
If you navigate to AlwaysUnloadDLL and (Default) does not appear follow the instructions below to create the entry for this setting.
Automatic Key Creation
1. You can download the registry file and simply merge it without having to modify the registry yourself – to get registry file Click Here
Note: When you download the file simply double-click on it, you will be prompted to confirm merging into your registry, click Yes and you’re done.
Manual Key Creation
1. Navigate to the following key;
HKEY_LOCAL_MACHINE > Software > Microsoft > Windows > CurrentVersion > Explorer
2. When you get to Explorer right-click on it and select New > Key, name that key AlwaysUnloadDLL and set the value to 1
3. Click OK and restart your computer
Source:Win Guides