 I have about 50 DVD’s that I have purchased over time, that’s close to $1,000 worth in just movies (assuming $20 per movie) I would like to know, that in case my DVD gets scratched or damaged, I have a backup of that movie somewhere. I have been using DVD Shrink now for a little over a year, it is an excellent piece of software, it’s easy to use and FREE!
The great thing about it is that you can go through the whole process of backing up your DVD with one piece of software. (Note: I have found that the newer movies I have bought cannot be decrypted by DVD Shrink, this is a result of new copy protection methods employed by the movie industry, I will cover another piece of software that does just that in another tutorial – either way DVD Shrink is great for DVD’s with the old encryption method). Follow the steps below to backup your precious DVD’s. As always comments and suggestions are welcome.
Warning: I am in no way encouraging users to copy movies which they do not own. It is ILLEGAL! This tutorial is for those of you who wish to make a backup copy of DVD’s you own in the event that something occurs to the originals.
Visual tutorial Part I and Part II
1. Download DVD Shrink and install
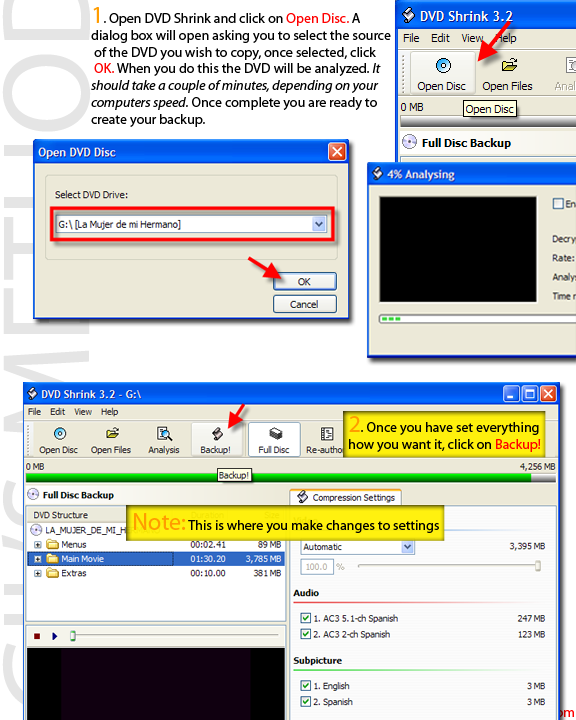
2. Open DVD Shrink and click on Open Disc. Select the drive containing your DVD. (DVD Shrink will run an analysis on the movie, it should take about a minute or two)
3. Once complete you will be given several options, most of the time the default settings are good enough, click Backup! (default settings are good unless you want to cut out menus or extra features, we’ll cover advanced settings in another tutorial, for now we are just making a backup of your entire movie).
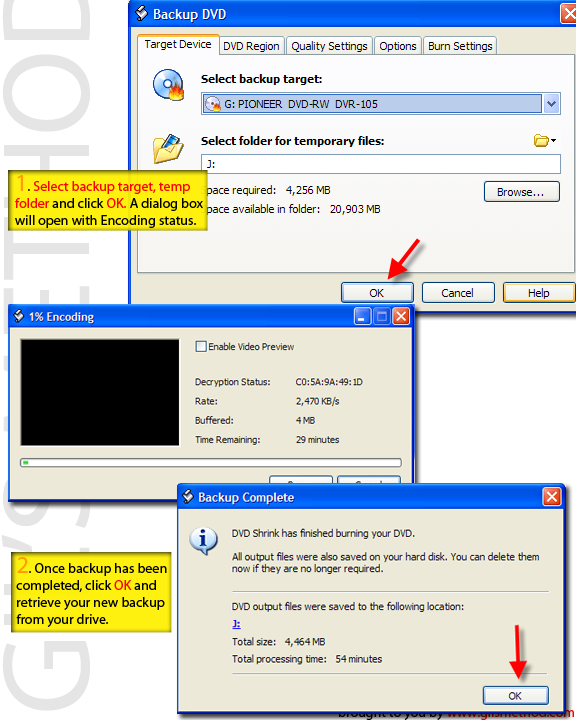
4. A dialog box will open with several options (again for the sake of simplicity we will not cover the advanced settings). Simply click on your Destination drive, this would be your burner and a temporary cache, for the software to temporarily store files as it decodes/encodes the DVD. A dialog box will open that will show you the Backup status. (If you run into a redundancy error during this phase, your DVD is protected by the newer encryption methods, you will need to use a program like DVD Decrypter that will take care of that for you – I will cover DVD Decrypter in a future tutorial)
5. Once completed, you can click OK and remove your DVD from the drive.
You have successfully created a backup of your DVD.
