How long does it take you to locate a book in a disorganized bookshelf? How about the same bookshelf with books arranged in alphabetical order? The latter should help you find the book much faster, the same principle applies to information stored on your hard drive, except one file will be broken into smaller pieces and scattered throughout the hard drive, it’s kind of like having pages of a book scattered in a bookshelf among other books…try putting it together in milliseconds. This is what hard drives essentially do, if your hard drive is fragmented, files and pieces of files are scattered about in no particular order making it more difficult and time consuming for your computer to locate those files, but if you defragment your hard drive, that is “organize†it, your computer will spend less time locating files and more time making you happy because it is much faster.
The guide below will show you how to schedule the defragmenter service in Windows 7 so that your PC is always running at its best. If you have any comments or questions please post them below.
Note: I used Windows 7 Ultimate for this guide. Your computer will most likely have a schedule for defragmentation already, however you can use this guide to modify the existing schedule. If you are using SSD’s (Solid State Disks) instead of traditional platter based hard drives you might want to take into account the fact that SSD’s useful life may be reduced with defragmenting and excessive writing to the disk. (Thanks to Michael Campbell for the Tip).
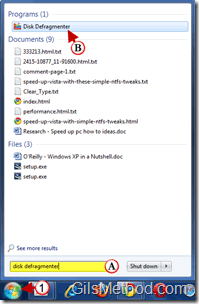
1. Click on the Orb to open the Start Menu and A. type disk defragmenter into the search box.
B. Click to open the Disk Defragmenter application listed under Programs in the search results.
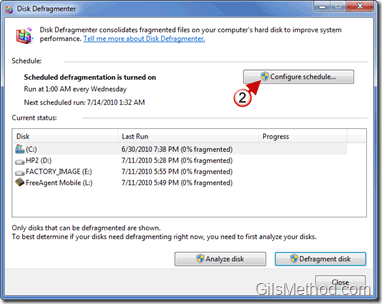
2. When the Disk Defragmenter window opens, click on the Configure schedule button.
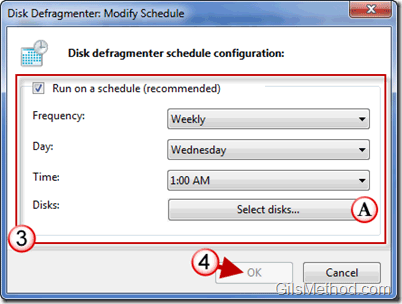
3. Set the Frequency, Day of the week, and Time to schedule defragmenting on your computer.
A. You can also specify which disks (Select disks…) to automatically defragment on the schedule specified (see below).
4. Click OK when you are done setting the schedule.
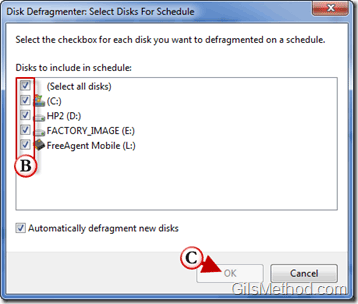
B. Select the disks you wish to include in the scheduled defragmentation and C. click OK.
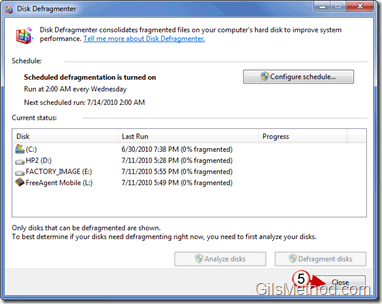
5. Verify the schedule and disks to defragment and click Close.
The disks will defragment on the specified schedule.

