As a grad student I am constantly writing papers for pretty much all of my classes, as such I have developed a distaste for anything related to APA or MLA. Fortunately, I recently stumbled on Word’s ability to keep track of citations, most importantly the ability to correctly format those citations throughout a paper, and finally the creation of a correctly formatted Works Cited page. The discovery sure made my day, so I decided to post it here along with instructions on how to use this awesome feature.
The guide below will walk you through the process of creating citations, managing your citations, and generating your Works Cited page. If you have any comments or questions, please post them below.
Software/Hardware Used: Word 2010 running on Windows 7, but these instructions apply to Word 2007 as well. In this guide I will be using the APA format, but you may choose the one that applies in your situation.
Setup References
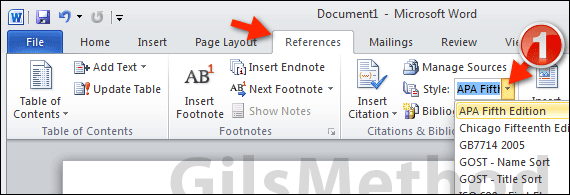
1. Before we begin, open Word and select the formatting style you wish to use. Click the References tab in the Office Toolbar and then click the Style drop-down and select the style you wish to use.
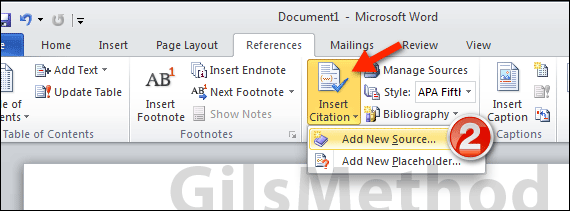
2. In the References tab click Insert Citation, this will open a drop-down, click Add New Source.
Unless you have already compiled a list of references in Word, you will first need to add a source before you can use it.
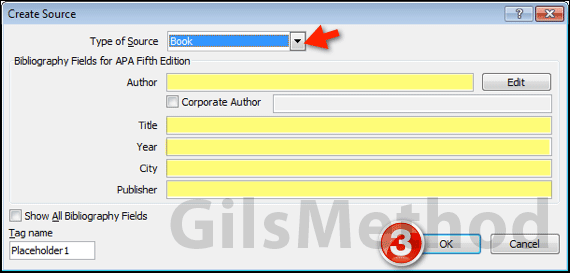
3. The Create Source window will open. Choose the Type of Source from the list and enter all of the available information about the source you are using. Click OK to save the source.

Note: Whenever you activate a field (the cursor is located in the field) an example of the formatting for that field will appear. This is very helpful if you’re not familiar with a specific style like APA.
Once you click OK in step 3 above, the reference will automatically be added to the document. If you wish to access the citation again, follow the next step.

Once added, citations can be accessed from the Insert Citation drop-down located in the References tab. To add an existing citation to the document you are working on, simply click Insert Citation then the citation you wish to use. This list provides you with recently used citations, if you wish to use citations that are not listed here, click the Manage Sources button (see below).
Manage Your Sources
Aside from creating references on the fly you have the option of adding, modifying, and deleting citations by using the Source Manager.
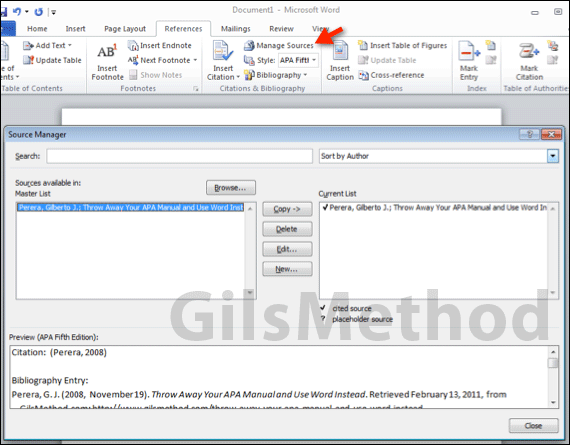
1. To manage your sources click on the Manage Sources window
The Manage Sources window will list all of the sources you have ever added in Word, you have the option of making them available to a specific document by bringing them over to the Current List area, you can accomplish this by clicking on the specific reference and hitting the Copy -> button. You can also remove references from either list by clicking on the Delete button, you can edit with the Edit button, and you can create new references by hitting the New button and following the steps above.
You can also preview a specific reference in the Preview section located at the bottom of the window.
How to Create a Bibliography/Works Cited Page
One of the most dreaded formatting and guideline intensive areas of any paper. When you use the steps above to create your references, a Works Cited/Bibliography page is a click away.
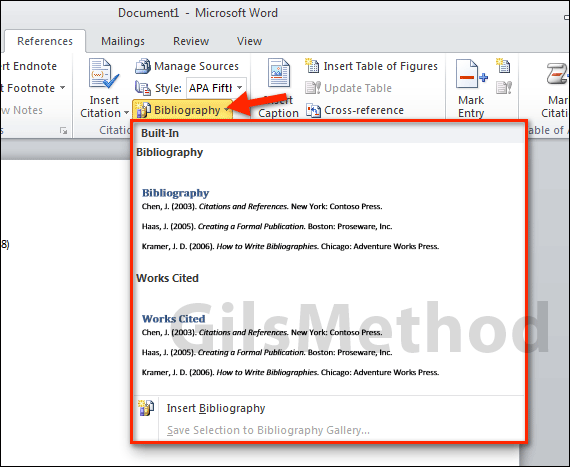
Click on the Bibliography button located in the References tab and select the page you would like to use, Bibliography or Works Cited. The Bibliography/Works Cited page will be inserted at the end of your document.It’s that simple. If you have any comments or questions please post them in the comments section below.


