As a frequent user of Excel I find that one of the most useful features is AutoFill. When preparing spreadsheets for presentations or when your organizing data to keep a sense of sanity, AutoFill will simplify that task. AutoFill will ensure data integrity and will maintain order when data series require it.
In the example below I will be compiling a list of articles in Excel. I will enter 1 row of data and use AutoFill to enter the remaining 9 rows. I will then switch from an article a day to an article everyday and introduce a pattern that Excel will also replicate. A task that could take me 15 minutes with typing or copy and paste will be done in less than 5 minutes with AutoFill. If you have any comments or questions about this feature, feel free to post them below.
Note: I used Excel 2007 when creating this tutorial.
Once you complete this how-to you will be able to use AutoFill to streamline data entry and spreadsheet formatting.
Using AutoFill
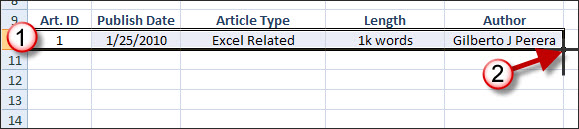
1. Select the row you wish to copy.
2. Click on the Fill Handle (the bottom right corner of the cell – your cursor should change to a + sign).
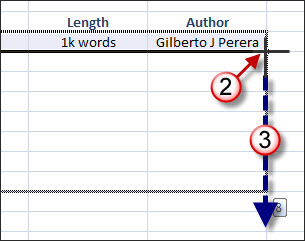
3. Drag the fill handle down to the desired number of rows.
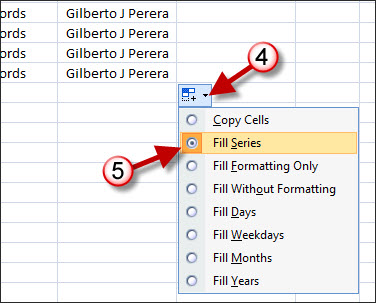
4. Click on the AutoFill button which will open the AutoFill menu (more on these options later).
5. Click on Fill Series from the menu.
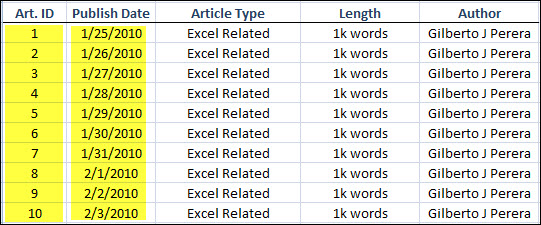
You will notice that the AutoFill feature automatically filled the series for the highlighted columns above. The Art. ID was incremented by as was the date. The other columns were copied.
Using AutoFill on Data with Patterns

6. Select the rows of patterned data or cells that you wish to use.
Note: The dates are three days apart and that one row lists Excel Related with 1k words and the other is Word Related with 2k words.
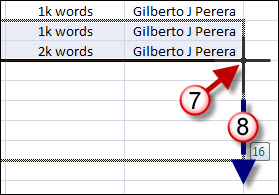
7. Click on the Fill Handle (the bottom right corner of the cell – your cursor should change to a + sign).
8. Drag the fill handle down to the desired number of rows.
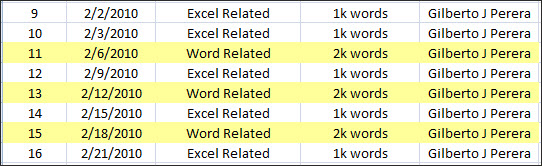
Notice how Excel automatically picked up on the pattern that I started with the data. The dates are now three days apart and articles are now Word Related with 2k words and Excel related with 1k words (see highlighted rows).
The AutoFill Menu
This is one of my best friends in Excel, it’s a time saver and a very easy to use feature. The AutoFill menu will appear whenever something is pasted into a cell or you perform a fill operation as described above. The options provided are limited by the data you are manipulating…so if you are working with dates you will see the date autofill options. More information on the menu items below.
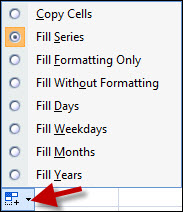
Depending on the data that you are copying you will see the following options.
- Copy Cells – You are simply copying the source cells.
- Fill Series – If your data contains numbers, Excel will automatically increment it based on a straight series or patterned data as described above.
- Fill Formatting Only – This option will only paste the formatting from your selection, the data in the destination cell(s) will remain the same.
- Fill Without Formatting – Opposite of Fill Formatting Only – only the data will pasted from the source, the destination’s formatting will remain intact.
- Fill Days – Fills days when using dates.
- Fill Weekdays – Fills weekdays when using dates.
- Fill Months – Fills months when using dates.
- Fill Years – Fills years when using dates.
