
I’m always looking for ways to tweak my computers, specifically my laptop. I recently came across a section of the Windows Vista Annoyances book that detailed how you can increase hard drive performance by tweaking the NTFS file system settings in the registry. I have created a series of screen shots along with explanations to walk you through the process and so that you too could tweak Windows Vista a bit more.
What’s NTFS? NT File System is the standard file system used by the operating system on your computer, specifically Windows 2000, XP, Server 2003, Server 2008, Vista, and 7. For more information follow this link.
The registry keys we will be modifying in this tutorial
- NtfsDisable8dot3NameCreation
- In the olden days of DOS and earlier versions of Windows, the operating system only supported 8 character file names + the 3 characters for the extension, hence the 8dot3. In newer versions of Windows this is no longer the case, however Windows still generates the 8dot3 file name for each file you create.
- Acceptable Values: 0 = enabled (default setting) and 1 = disabled
- Note: If you are running older applications in compatibility mode then you might want to ski modifying this key in case it has adverse effects with the older application.
- NtfsDisableLastAccessUpdate
- Each time you access or modify a file in Windows it will update that information accordingly, this of course is an additional operation that is performed on all files when enabled. You may be able to slightly improve performance by disabling this time and date stamp auto update.
- Note: Your files are not modified in any way when you disable this feature
- Acceptable Values: 0 = enabled (default setting) and 1 = disabled
- NtfsMftZoneReservation
- The MFT or the Master File Table is an index (think of a books index) of all the files on the hard drive (pages in a book). As time passes this table may become fragmented (think of a bookshelf that is out of order – it takes longer to find a book compared to a bookshelf that is ordered alphabetically or defragmented), the smaller the space allocated for the MFT the quicker it will become fragmented, but you have to be careful because to big of a size will cause to waste too much space.
- Acceptable Values: 0 thru 4
- Note: This change will not affect the current index, it will only affect its future growth. It is recommended that you set this value early on, after formatting a hard drive or installing a new one.
WARNING – Please backup your registry before proceeding with this tutorial.
Note: I used Windows Vista Ultimate for this Guide
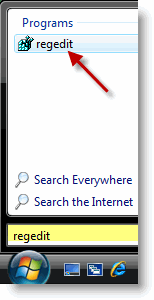
1. Click on the Orb (Windows Logo) and type regedit into the search box. When regedit appears in the search results click on it to open the Registry Editor.
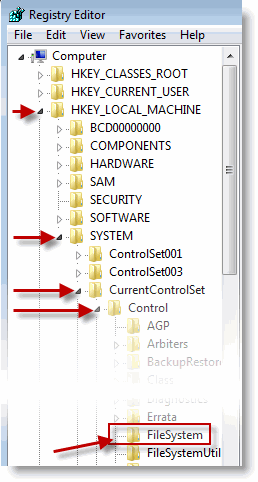
2. Navigate to HKEY_LOCAL_MACHINE > SYSTEM > CurrentControlSet > Control > FileSystem
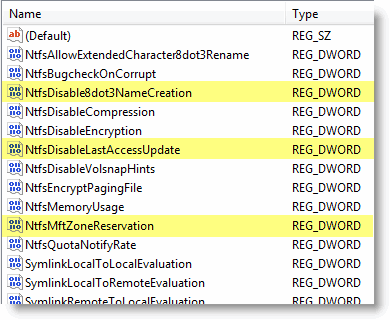
3. Locate the keys highlighted above. These are the keys you will be modifying in this tutorial.
- NtfsDisable8dot3NameCreation
- NtfsDisableLastAccessUpdate
- NtfsMftZoneReservation
Note: If the keys are not listed make sure that you are in the correct directory by verifying the location on Step 2 above. If the keys are still missing create the keys yourself by right-clicking in the white space and choosing New>DWORD (32-bit) Value. When prompted enter the information as described in the sections below for the missing keys.

4. Double-click the first key NtfsDisable8dot3NameCreation. When the dialog box opens set the Value data to 1, click OK to continue.
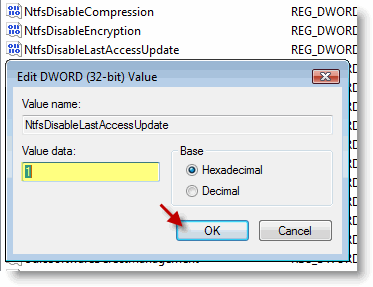
5. Double-click the first keyNtfsDisableLastAccessUpdate. When the dialog box opens set the Value data to 1, click OK to continue.
Before continuing to the next key, lets determine what the MFT size and allocation currently is on your computer. In order to do that we are going to access the command prompt to run the Disk Defragmenter program. Follow the steps below.
Open the Command Prompt (for instructions click here). Once opened, type the following command exactly as it appears;
defrag.exe -a -v c:

Press enter when you have entered the command above. Depending on your computer this could take seconds or several minutes, be patient.
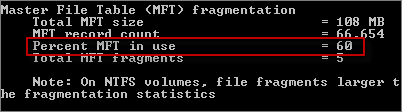
Note: This command generates a status report about your drive’s fragmentation level. Among the data listed you will find the percentage of MFT use.
When the process is complete you will see the message below. Take note of the Percent MFT in use at the end of the report. (In this example it is 60%)
Proceed to Step 6

6. Now that you know the percentage of the MFT usage you can double-click on theNtfsMftZoneReservation key. When the dialog box opens set the Value data to the recommended setting, click OK to continue.
Note: In this example I set it to 2 from 1 because the MFT was creeping towards the 100% mark.
Recommended Settings
- Default – 1
- Large hard disks – 2 or 3
- Very large hard drives with a lot of small files – 4 (maximum value)
7. Restart your computer for changes to take effect.
