Now that we know how to find places and addresses on the iPhone, we’ll need to explore getting directions and using the features available.
In this guide I will show you how to get directions on your iPhone and I will also show you how to use some of the coolest features including public transportation and walking directions.
Get Directions on Your iPhone

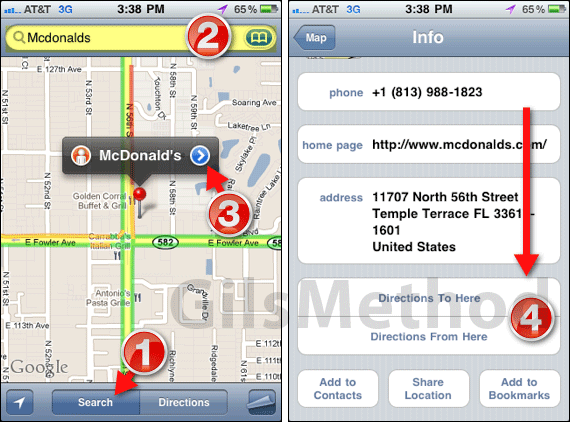
1. To begin a search you must first enable search by tapping the Search button at the bottom of the Maps app.
2. Enter a place name or address in the Search bar.
Note: You can also search for an address from your bookmarks.
3. When the place appears on the map, tap the small arrow next to the place name on the map to open the place’s Info page.
4. When the Info page loads swipe down and tap Directions to Here.
You can also tap Directions from Here, but chances are you are trying to get to the place you are searching for.
Making Sense of Directions

The Maps page will display the Start and End address on the top section of the App. The Start location will automatically default to your Current Location which is determined by the GPS.
5. When you are ready to route the directions, tap Route on the soft keyboard.
A. On the Directions screen before you tap Route you have the option of reversing the addresses to switch the Start and End addresses. Tap the double-headed arrow to swap locations,
6. The app will generate a route based on the information you provided. By default the directions assume that you will be using a car to get to the destination.
Tap Start to begin the turn-by-turn directions.
Lots of Options for Directions
Once the directions have loaded you will have several options that you can use to customize the route.
B. If your current location has changed or you wish to change the destination tap the Edit button and enter the new locations.
C. Once the directions are loaded you will have the option to choose which method of transportation you will be using. The options are car, public transit and walking (more on public transit in the next section).
D. Based on the transportation method you chose you will be presented with an estimate time to location.
If traffic is supported in the area you are searching you will also see a hint indicating that the estimate accounts for traffic.
E. The Directions button will be active when viewing directions.
The purple line indicates the route mapped by the Maps app.
F. The Green pin denotes the starting point (current location in most instances).
G. The Red pin indicates the ending point.

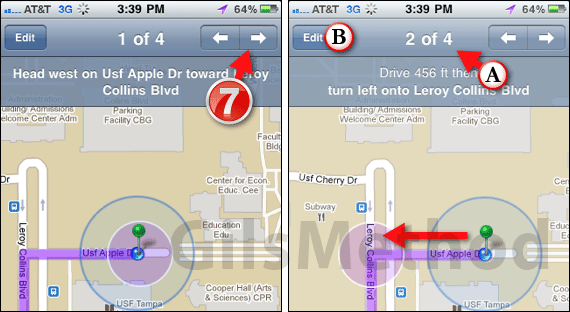
7. Navigate the step-by-step directions by using the Previous and Next arrows on the top-right corner of the app.
When you advance to the next turn, the junction will be highlighted by a purple circle enclosing the junction.
A. The Turn # of # of Turns indicates the turn you are on.
B. You can update the directions at any time by tapping the Edit button.
Get A List View of the Route
Some of us prefer visuals when provided with directions, however for those of you who prefer a list of turns for directions you can enable the List view in Maps.

1. Once you’ve generated the directions tap the Turn Page/Map View button on the bottom-right of the screen.
2. Tap the List button to enable this view.
The view will change from a map to a list view of your route. You can tap the small arrow next to the turn to view it on the map.
Get Public Transit & Walking Directions with Maps
If you live in a city with a great public transportation system or simply want to hop on a bus next time you go somewhere; the Maps app on your iPhone will provide you with all the details you need to make your journey hassle-free.

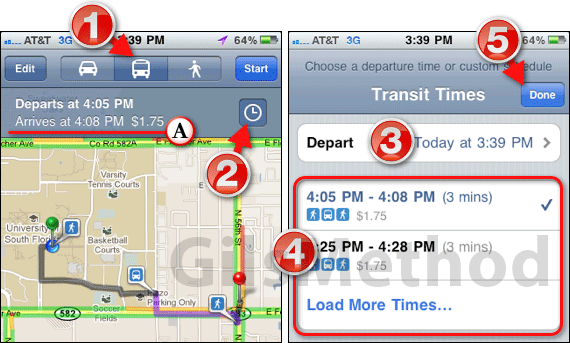
1. Once you’ve generated the directions tap the Public Transit button denoted by the small bus icon.
A. When you do this the map will update to include public transit in your route. You will be presented with the departure time for the bus/train along with estimated cost.
Note: Each turn in the route is denoted by an icon which indicates walking or public transit, so keep this in mind when planning your routes.
2. You also have the option of changing the route to use another bus/train at a different departure time or you can view the departure times for a specific date and time.
Tap the clock icon to set a different departure date and time.
3. The Transit Times page will open. Tap Depart to specify another date and time not listed or…
4. Tap one of the times listed.
Note: Tap Load More Times to explore other schedules.
5. Tap Done to save the changes you made to update the route and the estimates.
You can also get walking directions on your iPhone by tapping the walking icon on the Directions page.
Note: Walking directions are beta so be careful when using this feature to map out your next trip.
In the next section we will show you how to bookmark addresses with Maps on the iPhone.
ARTICLES IN THIS SERIES
- Navigating Google Maps on the iPhone
- Map Views & Traffic Information Explained
- Find Me On a Map & Determine Heading
- Searching for a Place or Address
- How to Get Directions (this page)
- Bookmark Your Favorite Places & Addresses
- Print a Map from Your iPhone – iOS 5 feature, coming soon
- Choose Other Routes – iOS 5 feature, coming soon
If you have any comments or questions please use the comments form below.
Software/Hardware used: iPhone 3GS running iOS 4.3.


