One of the simplest and most elegant implementations of Google Maps can be found in iOS.
In all its simplicity, Google Maps for iOS is packed with features that are not very obvious due to the streamlined and clutter-free UI the native iPhone app sports.
In this guide I will help you navigate all of the features in Google Maps for iOS while showing you how to use them.
Google Maps for iPhone Guide
In order to speed up loading times due to the large number of images used, I’ve divided this guide into multiple posts so that they load quickly and get you the information you need.
The first section of the guide which provides you with an overview of the Google Maps app is included on this post. To navigate to other sections of the guide use the links below and those included in each post.
- Navigating Google Maps on the iPhone (this page)
- Map Views & Traffic Information Explained
- Find Me On a Map & Determine Heading
- Searching for a Place or Address
- How to Get Directions
- Bookmark Your Favorite Places & Addresses
- Print a Map from Your iPhone – iOS 5 feature, coming soon
- Choose Other Routes – iOS 5 feature, coming soon
You can skip from section to section simply by clicking on the list of topics above which will take you to the selected section of the page discussing the feature.
Navigating Google Maps on the iPhone
Before we delve into Google Maps it’s important that we become familiar with the application’s interface so that we are all on the same page when referencing buttons, icons, and other application elements.
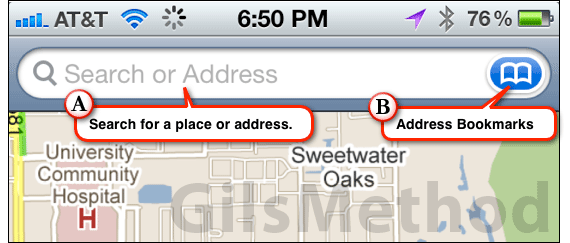
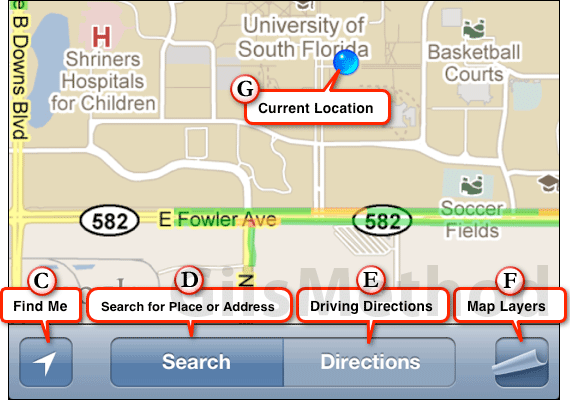
The two screenshots below are accompanied with notations to help you become familiar with the user interface.
Upper Section of Google Maps App

A. The Search bar is active by default. If you see two address bars instead of one, you are in Directions mode. To return to Search mode tap the Search button (D below).
Search allows you to look for a place by name or address.
B. The Bookmarks button is specific to Google Maps so it is not related to your Safari Bookmarks. These bookmarks are places/addresses that you have bookmarked on your iPhone for later use, more on bookmarking later.
You can access the list of bookmarks by tapping the Bookmarks button on the right side of the Search Bar.
Lower Section of Google Maps App

C. The small Arrow icon on the left allows you to quickly pinpoint your location on the map using your iPhone’s built-in GPS. Tapping the icon twice will change it so that the Current Location (G above) also displays your current heading/direction.
D. When active, the Search button allows you to quickly search for a place or address using the Search bar (A above).
E. If you are looking for directions simply tap the Directions button and you will be provided with a Start: and End: field so that you can plot your directions. See Get Directions.
F. The turn-page or map layers icon allows you to switch between Standard, Satellite, Hybrid, and List views. See Map Views Explained.
It also provides the option to include Traffic information on the maps and the ability to drop Pins and Print the map.
G. The Current Location icon is denoted by a blue dot on the map. This indicates your approximate location using your iPhone’s GPS.
Now that you are familiar with the overall look and feel of Google Maps check out the topics listed below to learn how to use Google Maps on your iPhone.
ARTICLES IN THIS SERIES
- Navigating Google Maps on the iPhone (this page)
- Map Views & Traffic Information Explained
- Find Me On a Map & Determine Heading
- Searching for a Place or Address
- How to Get Directions
- Bookmark Your Favorite Places & Addresses
- Print a Map from Your iPhone – iOS 5 feature, coming soon
- Choose Other Routes – iOS 5 feature, coming soon
If you have any comments or questions please use the comments form below.
Software/Hardware used: iPhone 3GS running iOS 4.3.


